In this post I will take you on my journey to find a working solution that does enable me to deploy my blog as a MSDeploy package to the Azure website.
What is in the Public Folder
First off I guess we should talk about what is in this folder that I call Public. As I have mentioned in my Hexo Post, the Hexo Generate command takes all my posts written in simple markup and creates the output that is my website and places it in a folder called public.
It is the output of this folder that I wish to create the MSDeploy package from. This is quite straight forward as I already knew that you can use MSDeploy to not only deploy a package but also create one. This will require knowing how to call MSDeploy from the command line.
Calling MSDeploy directly via Command Line
The basic syntax to create a package using MSDeploy is to call the program MSDeploy.exe then the parameter -verb and the verb choice is pretty much always sync. Then you pass in the parameter -source and this one we are going to say where the source is and finally the -dest which we tell it where to place the package or where to deploy the package to if the source is a package.
Using Manifest files
MSDeploy is very powerful with so many options and things you can do with it. I have found it difficult to learn because as far as I have found, there is no good book or course that you can take that will really take you into any real depth to learn this tool. I did come across a blog: DotNet Catch that covers MSDeploy quite often. It was there that I did learn about creating and deploying MSDeploy packages using Manifest files.
In this scenario I have a small xml file that says where the content is found and for that I write out a path to where the public folder is on my build machine. I call this file: manifest.source.xml
<?xml version="1.0" encoding="utf-8"?>
<sitemanifest>
  <contentPath path="C:\3WInc-Agent\_work\8\s\public" />
  <createApp path="" />
</sitemanifest>
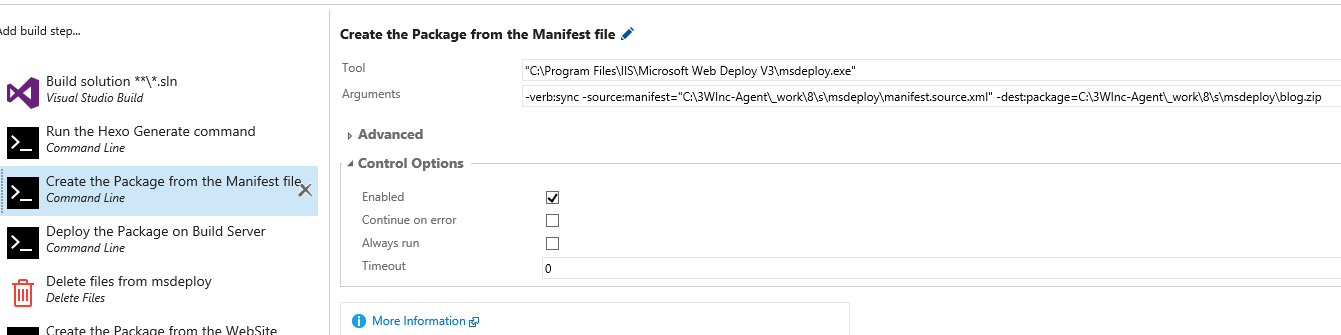
With the source manifest and an existing application that I want to package up sitting in the public folder at the disclosed location, I just have to call the following command to generate an MSDeploy package. If you are calling this from the command line on your machine then this should all be on one line.
"C:\Program Files\IIS\Microsoft Web Deploy V3\msdeploy.exe"
-verb:sync
-source:manifest="C:\3WInc-Agent\_work\8\s\msdeploy\manifest.source.xml"
-dest:package=C:\3WInc-Agent\_work\8\s\msdeploy\blog.zip
If you are calling this from TFS you would use the command line task and in the first line called Tool you would put the path to the msdeploy.exe program. The other two lines would be one line and entered into the Arguments box.
Now in order for that to work I need a similar xml file that is used for the destination file to tell MSDeploy that this package is a sync to the particular website. This file I called: manifest.dest.xml
<?xml version="1.0" encoding="utf-8"?>
<sitemanifest>
  <contentPath path="Default Web Site" />
  <createApp path="Default Web Site" />
</sitemanifest>
The syntax to call this blog.zip package and the destination manifest file is:
"C:\Program Files\IIS\Microsoft Web Deploy V3\msdeploy.exe"
-verb:sync
-source:package="C:\3WInc-Agent\_work\8\s\msdeploy\blog.zip"
-dest:manifest="C:\3WInc-Agent\_work\8\s\msdeploy\manifest.dest.xml"
This works great except that I cannot use the xml files when deploying to my Azure websites as I do not have that kind of control on them. It is not a virtual machine that I can log onto or use a remote PowerShell script against to do my bidding and this package won’t deploy onto that environment without it. I need another approach to getting this to work the way I need it to.
Deploy to Build IIS to create a new MSDeploy package
This next idea that I came up with is a little strange and I had to get over the fact that I was configuring a web server on my Build Machine but that is exactly what I did do. My build machine is a Windows Server 2012 R2 virtual machine so I turned on the Web Server Role from the Roles and Features Service. Then using the above set of commands that I called from a Command Line task just like the test I used to create the package from the public folder I Deployed it to the Build Machine.
At this point I could even log into the build machine and confirm that I do indeed have a working web site with all my latest posts in it. I then called MSDeploy once more and created a new Blog.zip package from the web site.
"C:\Program Files\IIS\Microsoft Web Deploy V3\msdeploy.exe"
-verb:sync
-source:iisApp="Default Web Site"
-dest:package="C:\3WInc-Agent\_work\8\s\msdeploy\blog.zip"
The resulting blog.zip was easily deployed to my Azure website without any issue what so ever. As you may have noticed that I have the blog.zip file with the exact same name and place as the old one. There was no need to keep the first one as that was just used to get it deployed to the build machine so that we could create the one that we really want. In order to make sure that went smoothly I deleted the old one before I called this last command which is also a command line task in the build definition.
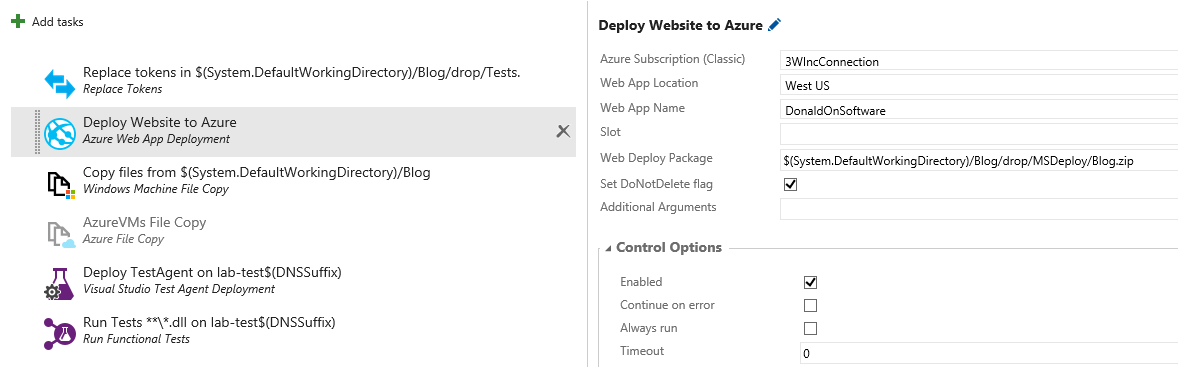
Success on Azure Website
In my release definition for the Azure web site deployment I just needed to use the built-in out of the box task called “Azure Web App Deployment” point it to where it could find the blog.zip file and tell it the name of my Azure web site and it took care of the rest.