The concept of unit testing for a database and really this means a database project still seems like a wild idea. Of course I am still surprise how many development shops still use their production database as their source of truth which it shouldn’t be but that’s because they do not have their database in source control. In order to take you down the road to explore some of the benefits that are going to be available to you with being able to run unit tests on your database I need to get us all caught up with how to create a database project as this is where the magic happens.
Creating a Database Project
You need to have Visual Studio 2010 Premium or higher to create a database project. One of the options that are available to us is to reverse engineer an existing database and that is what we are going to do in these first steps. I have installed the sample database called AdventureWorks. This is available as a free download from the Codeplex site.

From Visual Studio you will want to create a new Project and select the SQL Server 2008 Wizard which can be found under the SQL Server node found under the Database category. Give it a name, I called my AdventureWorks and give it a location on your hard drive where you want the project to be located.
A wizard will popup and take you through a number of pages, just accept the defaults until you get to the Import Database Schema page as this is something we do want to do is to import the AdventureWorks database.

Make sure you check the Import existing schema and then you will likely want to click on the New Connection button unless you have made a previous connection to the database, that connection string won’t be found in the dropdown.
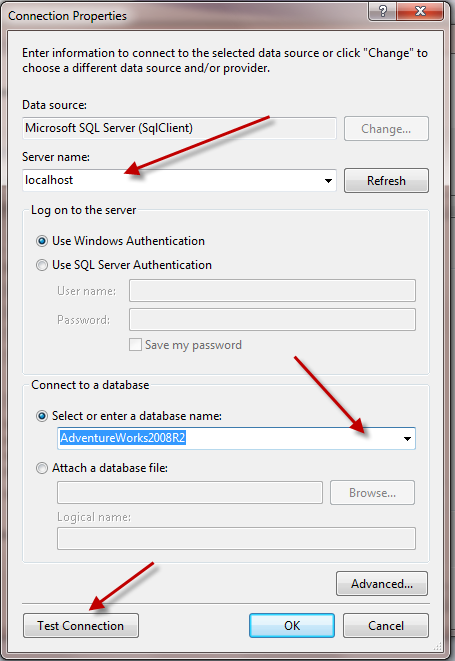
If you have connected to databases in the past this dialog box should be very familiar to you. Basically we need to say where the SQL server is. In this case it is on my local machine and is the default instance. Other common server names are also localhost\SQLExpress as that is the name instance that SQL Express creates when it is installed. After you get the server instance completed the dropdown of database names will be populated and from there you should be able to find the AdventureWorks database. I also like to click on the Test Connection button just to confirm that there aren’t any connectivity issues. Click OK and we are ready to move on.
Click Next and continue through the wizard pages and accepting the defaults. On the last page click Finish. This is where this Visual Studio wizard really does it’s work as it creates the project and does a complete reverse engineering of the database. The end result is a Visual Studio SQL Database project that represents the database in code which is suitable for checking into Source Control, capable of deploying changes that might be made to this project, being able to compare changes between versions and much much more.
Lets get to Unit Testing
When you are on a database project as in I have physically clicked on it so that it has focus you will see that a number of toolbar buttons appear. We want to click on the one called Schema View.
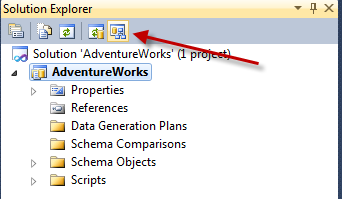
This brings up another little window in the same area as the Solution and Team Explorer area of Visual Studio called the Schema View.
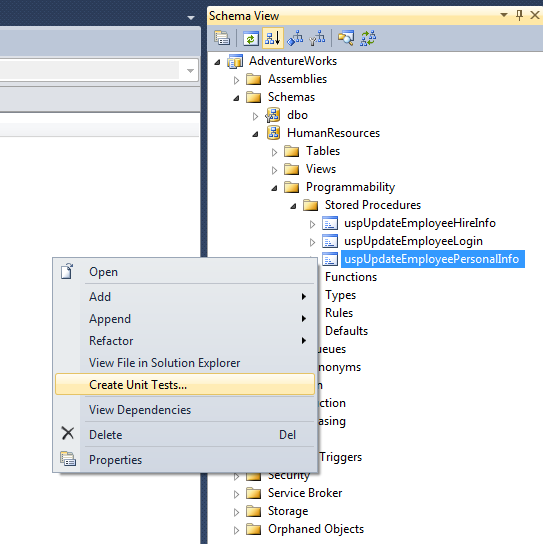
From this view you will want to expand Schemas, then expand the HumanResources, expand Programmability, Stored Procedures and finally you want to right click onto the uspUpdateEmployeePersonalInfo and choose Create Unit Tests…
If you don’t already have a Test Project the next step will let you create a skeleton Unit test for this stored procedure and the option to create a new Test project in the language of your choice.
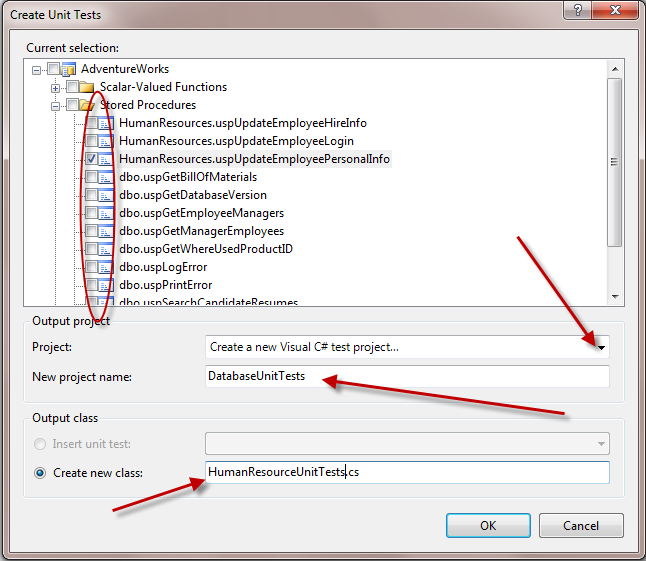
You will find that when this window opens you can choose more than just the one stored procedure that we choose in the previous step but yours is the only one that is checked. If you did want to have more than one stored procedure in the same class file you could pick them as well. Then set the Project name or select and existing Test Project and give it a decent class name. I named mine HumanRecourceUnitTests.cs. After you click OK it will build all the pieces the test project and default unittest.cs file that we don’t need and everything just starts to look like a typical Unit Test until the following dialog pops up.
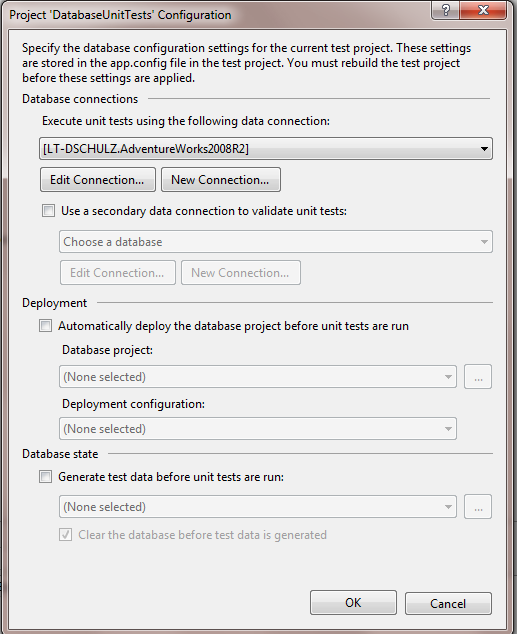
Now in order to run unit tests against the database you need a connection to the database. In the first part of this you should be able to find your original stored procedure that you used to create the database project. You will notice that this dialog has an optional additional what it calls a secondary data connection to validate unit tests. In this sample we will not need this but in a real world application you may so let me explain that scenario. When an application that is built with a database connection, typically that application and the connection string would just have enough rights to run the stored procedures and nothing else. In those cases you will want to test those connection string when running the stored procedure that you are testing but that same connection string would not have the rights to check the database to see if those rights are valid especially in a scenario where you want to check if the right values got inserted or deleted, that is where this secondary data connection comes in, it would be a data connection that had higher rights to look at those values directly from the tables.
After you have clicked the OK button Visual Studio will display a skeleton of a unit test to test this stored procedure.
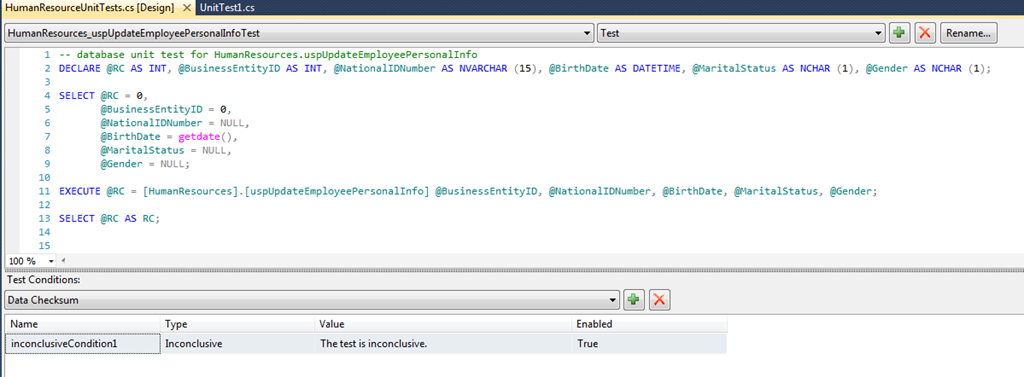
In theory we have a unit test that we could run, but the results would indicate that the results are inconclusive because although this stored procedure is being run, it is really just exercising the stored procedure and not really testing it as in giving it some values to insert and checking if those values come back.
We are going to replace the unit test calls here with the following code snippet. I have it all in one piece here for you to easily grab this but following this I will break down this code so you can see what is going on. It is very similar to what the skeleton provided with us but we give it some distinct values.
-- Prepare the test data (expected results)
DECLARE @EmployeeId int

SELECT TOP 1 @EmployeeId = EmployeeId
	FROM HumanResources.Employee

-- Wrap it into a transaction to return us into a clean state after the test
BEGIN TRANSACTION

-- Call the target code
EXEC HumanResources.uspUpdateEmployeePersonalInfo
	@EmployeeId, '987654321', '3/2/1987', 'S', 'F'

-- Select the results to verify
SELECT NationalIdNumber, Birthdate, MartialStatus, Gender
	FROM HumanResources.Employee
	WHERE EmployeeId = @EmployeeId

ROLLBACK TRANSACTION
The first part of this code is to capture the EmployeeId that we want to update so that is what the first DECLARE statement does. In the next call we just want to capture an existing EmployeeId from the Employee table and because we really don’t care which on it runs us but we only want want we use the TOP 1 clause in that statement. At this point our declared variable @EmployeeId now has this value.
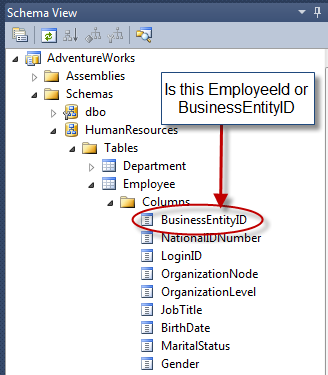
Note: I have found that there could be a breaking change here that depends on which version of the adventure works database that you have as some will have the employeeId and others will have this column named BusinessEntityID. To find which one you have go back to the Schema View of the project and expand the Schemas, HumanResources and Tables. Find the Employee table and expand the Columns, the column in question will be that first one right there.
Because the stored procedure will make changes to the data in the table and we may not want to actually commit those changes we just want to test these changes we surround the next pieces around a transaction and after we have collected our validation values we can roll this back.
After the transaction we call the update stored procedure and pass in some specific data. Next we call a select statement to get those values from the table with the EmployeeId that we just passed into the previous steps. Finally we roll the whole transaction back so that we do not actually make any changes to the database so we can run this test over and over.
Before we can actually run this test we need to make some changes to the Test Conditions portion of the unit test. First you will want to remove the existing entry that is shown there by clicking on the Delete Test button.

After you have removing the existing Test Condition we can then add a new one or more to verify the results. Select Scalar Value from the dropdown control and click on the “+” button.

On the scalarValueCondition1 line that this action creates, right click on this line and choose Properties, which will display the properties window. Update the following information:
- Name: VerifyNationalId
- Column number: 1
- Enabled: True
- Expected value: 987654321
- Null expected: False
- ResultSet: 1
- Row number: 1
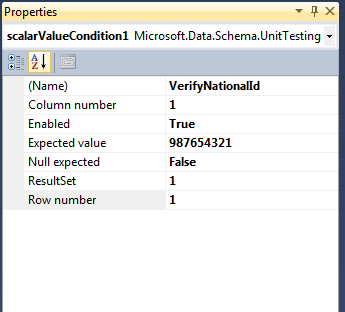
What is really happening here is that we are going to look at that first column and see if it matches the NationalId that we sent to the stored procedure. NationalId is the first column that is returned in the select statement.
We are now ready to run the unit test and see that it is working and pass the test. Typically in a unit test you could be anywhere in the method of the unit test do a right click and you will see one of the context choices being to run test. However what we have been working on so far has been the design surface of the database unit tests which is why we were able to write SQL statement to write our tests. To see or get to the actual code page you need to go back to the HumanResourceUnitTests.cs file and right click on it and choose view code.
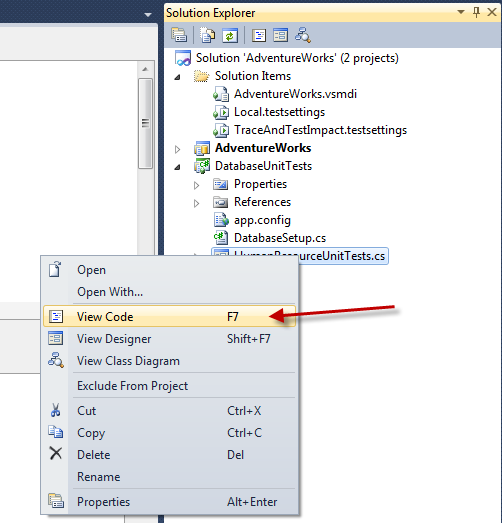
As an alternative you could select the file in the solution and press the F7 key, either way you will then be looking at the actual test and if you right click anywhere within that method you will see that one of your choice is to Run Tests. Do that now and you will see the test results go from a Pending to hopefully a Pass. If you do get a failure with an exception you will want to check the column names from this table. Some of the names changed and even the way they are spelled. It appears to be case sensitive as well. Like I mentioned before, there seem to be more than one version of this sample database out there and they did make some changes.

Now that we do have a working test, I always like to make a change to prove that it is working by making it fail. So to make it fail, change the Expected value to 9876543210000. I basically just added 4 zeros to the end of the expected result. Re-run the test and it should fail and if we look at the Test Result Details we can see that the expected results did not match, which is exactly what we expected.
Take out the padded zeros and run the test once more so that we get a passed test once more. This is just a step to keep or tests correct.
Associate the Unit Test to a Test Case
The following section is going to need TFS 2010 in order complete this part of the walk through, and even better if you have Lab Management setup to complete the development, build, deploy, test cycle on these database unit tests.
Right now, the unit test that we created can be run from Visual Studio just like we have done in this walk through. You can also make these part of an automated build which if this test project was included in the solution for an automated build in Team Foundation Server (TFS) it would automatically run and be part of the build report. However, this would not update the Test Plan / Test Suite / Test Case that the QA people are using to manage their tests, but it can.
In Visual Studio, Create a new Work Item of type: Test Case, and call it “uspUpdateEmployeePersonalInfo Stored Procedure Test”. We won’t fill anything in the steps section as we are going to go straight to automation with this Test Case. Click on the Associated Automation tab and click on the ellipse “…” button
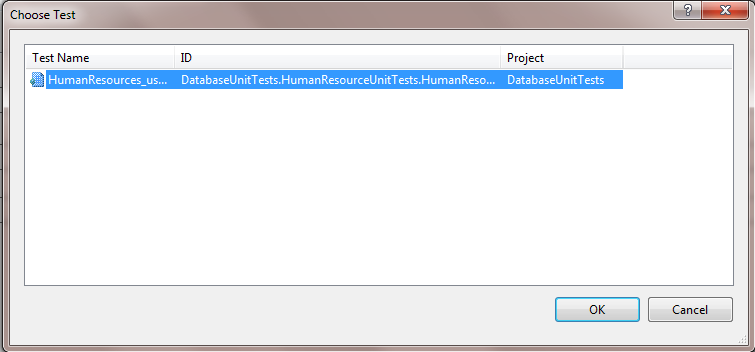
This will bring up the Choose Test dialog box and because we have just this one test open in Visual Studio we will see the exact test that we want associated with this test case. Click on the OK button.
We now have a test case that can be used to test the stored procedure in automation. When this test case is run in automation it will update the test results and will be reported to the Test Plan and Suite that this test case is a part of.